Overview
This post is the second in a series that plans to document my progress through installing and configuring a small OpenStack Lab.
For other posts in this series, see the overview section of the introduction post.
This post will cover the creation of our Virtual Machines in VirtualBox using Vagrant, a tool used to spin up reproducible development environments using most mainstream hypervisors.
Installation
Installation of Vagrant on Ubuntu (my choice of desktop distribution) requires downloading the deb file from the official website, or (as I recently found out) adding a community repository which is a kind of proxy-repository as it redirects to the packages from HashiCorp themselves.
For instructions on how to install Vagrant using this repo, visit the website here.
There is a Vagrant package that is available in the default repositories, but this isn’t kept up to date.
An additional step I’ll take is to copy the bash completion script for Vagrant over so that it can be used (I don’t know why this isn’t done by default, seeing as the file is included in the package anyway - see Github issue #8987).
$ sudo cp /opt/vagrant/embedded/gems/2.0.3/gems/vagrant-2.0.3/contrib/bash/completion.sh /etc/bash_completion.d/vagrant.sh
Remember to replace the version directories with your version of Vagrant.
You’ll also need to start a new shell in order for this to take effect.
With Vagrant, the next step might be to install a plugin to support the hypervisor (named a Vagrant ‘provider’) you are using, but VirtualBox is supported by default and so we don’t need to do this.
Now we need to add a ‘Box’, which is Vagrant’s term for an image. The difference between Vagrant boxes and most other operating system images is that boxes are pre-made and configured, from which new virtual machines are cloned (as opposed to being installed by the user).
For example, there is a Cumulus VX Vagrant box available that we’ll use in this project - named “CumulusCommunity/cumulus-vx”. We’ll add this now along with a Ubuntu 18.04 box.
Note that I’m not using the official Ubuntu box, as I ran into issues booting this on my machine (See the link here, except those fixes didn’t work in my case). There are other Ubuntu boxes like geerlingguy/1804 that don’t have the same issue.
$ vagrant box add CumulusCommunity/cumulus-vx
$ vagrant box add geerlingguy/ubuntu1804
During this step, if a box has more versions for more than one provider it will prompt to ask which version to download.
These boxes are stored globally for the user in the directory “~/.vagrant.d/boxes” and the currently installed boxes can be shown using the command below.
$ vagrant box list
CumulusCommunity/cumulus-vx (virtualbox, 3.6.2)
geerlingguy/ubuntu1804      (virtualbox, 1.0.6)
Setup
Now that we’ve got our host ready, we’ll create a ‘Vagrantfile’.
As described by the official documentation:
The primary function of the Vagrantfile is to describe the type of machine required for a project, and how to configure and provision these machines”
More simply put, the file marks the root directory of a project in Vagrant and some configuration associated with it. This is created using the vagrant init command in the directory that you want to use as your project root:
$ mkdir -p Vagrant/OpenStack_Lab/
$ cd Vagrant/OpenStack_Lab/
$ vagrant init
$ ls
Vagrantfile
By default this file is pretty empty, with only three lines uncommented.
Vagrant.configure("2") do |config|
 config.vm.box = "base"
end
The do and end lines form a ‘block’ in Ruby, in which you define items for the function (the “Vagrant.configure” part) to invoke.
With the Vagrantfile, all we’re doing is defining configuration. Nothing fancy here!
Let’s change some then.
According to the Getting Started documentation, the first thing we should change is the base box to whichever of the boxes we’ve downloaded we want to use.
However because our project isn’t quite as simple as using only one VM we need to define multiple, and this is done by adding "config.vm.define" blocks inside the main configure block.
We’ll do one block for each of the VM’s we need - 2 spine switches, 4 leaf switches, 2 Ubuntu OpenStack machines and another Ubuntu VM for ZTP:
Vagrant.configure("2") do |config|
 # ZTP Box
 config.vm.define "openstack_ztp" do |device|
	 device.vm.box = "geerlingguy/ubuntu1804"
 end

 # Cumulus Boxes
 config.vm.define "cumulus_spine01" do |device|
	 device.vm.box = "CumulusCommunity/cumulus-vx"
 end

 config.vm.define "cumulus_spine02" do |device|
	 device.vm.box = "CumulusCommunity/cumulus-vx"
 end

 config.vm.define "cumulus_leaf01" do |device|
	 device.vm.box = "CumulusCommunity/cumulus-vx"
 end

 config.vm.define "cumulus_leaf02" do |device|
	 device.vm.box = "CumulusCommunity/cumulus-vx"
 end

 config.vm.define "cumulus_leaf03" do |device|
	 device.vm.box = "CumulusCommunity/cumulus-vx"
 end

 config.vm.define "cumulus_leaf04" do |device|
	 device.vm.box = "CumulusCommunity/cumulus-vx"
 end

 # OpenStack Boxes
 config.vm.define "openstack_control" do |device|
	 device.vm.box = "geerlingguy/ubuntu1804"
 end

 config.vm.define "openstack_compute" do |device|
	 device.vm.box = "geerlingguy/ubuntu1804"
 end
end
With this configured, we could go ahead and provision then boot the machines we’ve specified using the vagrant up command, and then the vagrant destroy to delete the VM’s.
However, there is still more configuration to do before we can be happy that our lab can be created in its entirety.
VirtualBox configuration
VirtualBox specific configuration can be defined both globally individually for each VM using another block - .vm.provider
For example, we can set what each VM is named in VirtualBox:
config.vm.define "cumulus_spine01" do |device|
	 device.vm.box = "CumulusCommunity/cumulus-vx"

	 device.vm.provider "virtualbox" do |vb|
		 vb.name = "openstack_spine01"
	 end
 end
More importantly, we can also specify how many CPU’s and how much RAM we allocate to the VM:
config.vm.define "cumulus_spine01" do |device|
	 device.vm.box = "CumulusCommunity/cumulus-vx"

	 device.vm.provider "virtualbox" do |vb|
		 vb.name = "openstack_spine01"
		 vb.memory = 1024
		 vb.cpus = 1
	 end
 end
Most other VirtualBox specific configuration needs to be done through the use of VBoxManage modifyvm commands and a .customize entry.
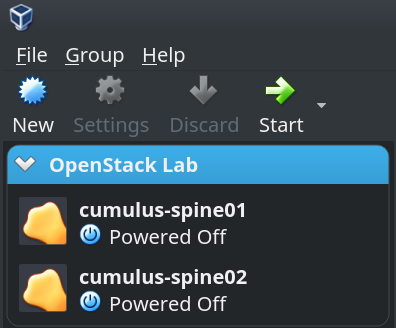
In the below, we’re adding all VM’s to a group in VirtualBox so that we can easily tell that it is a part of the OpenStack Lab.
config.vm.provider "virtualbox" do |vb|
	 vb.customize ["modifyvm", :id, "--groups", "/OpenStack Lab"]
 end
Note that this is done at the “config” level, outside of each host. This is an example of the global configuration that I referenced earlier.
With the above, the VM’s will now be grouped in VirtualBox, like so:
This would usually look like the following if you we’re using the VBoxManage command line utility:
VBoxManage modifyvm "cumulus_spine01" --groups "/OpenStack Lab"
We’ll apply the configuration completed above to the rest of our machines and we’re done with VirtualBox configuration:
# ZTP Box
config.vm.define "openstack_ztp" do |device|
 device.vm.box = "geerlingguy/ubuntu1804"

 device.vm.provider "virtualbox" do |vb|
	 vb.name = "ztp-server"
	 vb.memory = 2048
	 vb.cpus = 1
 end
end

# Cumulus Switches
config.vm.define "cumulus_spine01" do |device|
	 device.vm.box = "CumulusCommunity/cumulus-vx"

	 device.vm.provider "virtualbox" do |vb|
		 vb.name = "cumulus_spine01"
		 vb.memory = 1024
		 vb.cpus = 1
	 end
 end

 config.vm.define "cumulus_spine02" do |device|
	 device.vm.box = "CumulusCommunity/cumulus-vx"

	 device.vm.provider "virtualbox" do |vb|
		 vb.name = "cumulus_spine02"
		 vb.memory = 1024
		 vb.cpus = 1
	 end
 end

 config.vm.define "cumulus_leaf01" do |device|
	 device.vm.box = "CumulusCommunity/cumulus-vx"

	 device.vm.provider "virtualbox" do |vb|
		 vb.name = "cumulus_leaf01"
		 vb.memory = 1024
		 vb.cpus = 1
	 end
 end

 config.vm.define "cumulus_leaf02" do |device|
	 device.vm.box = "CumulusCommunity/cumulus-vx"

	 device.vm.provider "virtualbox" do |vb|
		 vb.name = "cumulus_leaf02"
		 vb.memory = 1024
		 vb.cpus = 1
	 end
 end

 config.vm.define "cumulus_leaf03" do |device|
	 device.vm.box = "CumulusCommunity/cumulus-vx"

	 device.vm.provider "virtualbox" do |vb|
		 vb.name = "cumulus_leaf03"
		 vb.memory = 1024
		 vb.cpus = 1
	 end
 end

 config.vm.define "cumulus_leaf04" do |device|
	 device.vm.box = "CumulusCommunity/cumulus-vx"

	 device.vm.provider "virtualbox" do |vb|
		 vb.name = "cumulus_leaf04"
		 vb.memory = 1024
		 vb.cpus = 1
	 end
 end

 # OpenStack Boxes
 config.vm.define "openstack_control" do |device|
	 device.vm.box = "geerlingguy/ubuntu1804"

	 device.vm.provider "virtualbox" do |vb|
		 vb.name = "openstack_control"
		 vb.memory = 4096
		 vb.cpus = 1
	 end
 end

 config.vm.define "openstack_compute" do |device|
	 device.vm.box = "geerlingguy/ubuntu1804"

	 device.vm.provider "virtualbox" do |vb|
		 vb.name = "openstack_compute"
		 vb.memory = 8192
		 vb.cpus = 2
	 end
 end
Networking
Vagrant networking is as simple (or as hard) as the provider (hypervisor) you are using makes it.
There is one limitation with VirtualBox, in that it can only support a maximum of 36 interfaces per machine.
This doesn’t bother us because the maximum amount of interfaces one of our machines has is 4 (Each leaf switch has 1 management, 2 uplinks to the spine switches and 1 downlink interface to the attached OpenStack host).
One other thing to be aware of is that Vagrant sets the first network interface as a NAT interface by default.
A NAT interface in VirtualBox allows all communication outbound (through NAT of the hosts primary interface), but only allows connections inbound (including from other VM’s) if they are port-forwarded.
While we could leave this as the default and configure port-forwards for each inbound connection, this becomes cumbersome when you start to think about DHCP/TFTP traffic (to/from the ZTP server) and OpenStack control traffic.
Instead we can change the first network interface for all hosts to be part of a “public network” (a bridged network in VirtualBox).
config.vm.network :public_network,
	 adapter: "1", # Set the first network adapter
	 bridge: "enp6s0", # To bridge over enp6s0
	 auto_config: false # And don't use Vagrant to configure this inside the VM
This comes with the caveat that Vagrant can no longer configure the network interface of the VM, and so cannot give it an IP address. This instead needs to be completed by one of the following:
- Use a Vagrant box that comes with a preconfigured network interface
- Configure the interface manually by logging in through the console
- Use a DHCP to assign network addressing
We’ll use DHCP in this lab as we’re going to be configuring a DHCP server for ZTP anyway.
This does mean that we’ll need to boot and set an address on the ZTP server manually before provisioning any of the other hosts. I’ll cover this in the next post.
To make this easier down the road, lets set the MAC address of the first in VirtualBox statically. This is done in the device.vm.provider section of each guest, like setting the RAM and the CPU:
vb.customize ["modifyvm", :id, "--macaddress1", "080027000001"]
Because Vagrant no longer configures the interfaces itself, we also need to tell it what IP address to connect to in order to finish its’ provisioning.
This is done with the .ssh.host option under each host.
device.ssh.host = "192.168.11.201"
The last thing we need to do is configure the network interfaces for the links between the VM’s. This will be done using “private networks” (internal networks in VirtualBox).
For example, to configure the link between the first spine and leaf switches, we need to add the below to each the config of each VM:
  device.vm.network "private_network",
		 adapter: "2", # Which adapter to configure on the VM
		 virtualbox__intnet: "spine01-to-leaf01", # The internal adapter to use
		 auto_config: false # Don't use Vagrant to configure this inside the VM
Note that the double underscore isn’t a typo.
Nested Virtualisation
Because our OpenStack hosts will themselves have virtual machines running on them, we need to pass the relevant CPU flags to the hosts in Virtualbox.
This is done by enabling the --nested-hw-virt customization in Virtualbox for each of the machines.
vb.customize ["modifyvm", :id, "--nested-hw-virt", "on"]
Storage
The final touch to our Vagrantfile will be adding a second disk to each of the OpenStack hosts, to be used as extra space for OpenStack services.
This will be done using some more customize commands.
Let’s take a look at the snippet for the control host:
      file_to_disk = 'control_disk2.vdi'
      unless File.exist?(file_to_disk)
        vb.customize ['createhd', '--filename', file_to_disk, '--size', 50 * 1024]
      end
      vb.customize ['storageattach', :id, '--storagectl', 'IDE Controller', '--port', 1, '--device', 0, '--type', 'hdd', '--medium', file_to_disk]
In the first line we define a variable to be used in the configuration lines coming next.
Then we check for the existence of the disk, because we don’t want to create it if it already exists.
Then, in the customize commands, we create the disk file and then attach it to the machine.
Conclusion
With this configuration file we have configured Vagrant to provision all our VM’s with the correct interface-to-adapter mappings.
While we could run vagrant up to ask Vagrant to provision and turn on the VM’s, Vagrant won’t finish as it will not be able to reach the hosts.
Before it can do so, we need to configure a DHCP server to hand out addresses, which I’ll cover in the next post.
Appendices
References
Vagrant - Getting Started
Vagrant - Official Documentation
VirtualBox Manual - Chapter 6: Virtual Networking
VirtualBox Manual - Chapter 8: VBoxManage
Cumulus VX Documentation - Getting Started on VirtualBox
Cumulus VX Documentation - Vagrant and VirtualBox
Versions used
Desktop Machine: kubuntu-18.04
VirtualBox: virtualbox-5.2.10
Vagrant: 2.1.2
Cumulus VX Vagrant Box: CumulusCommunity/cumulus-vx (virtualbox, 3.6.2)
Ubuntu Server Vagrant Box: geerlingguy/ubuntu1804 (virtualbox, 1.0.6)